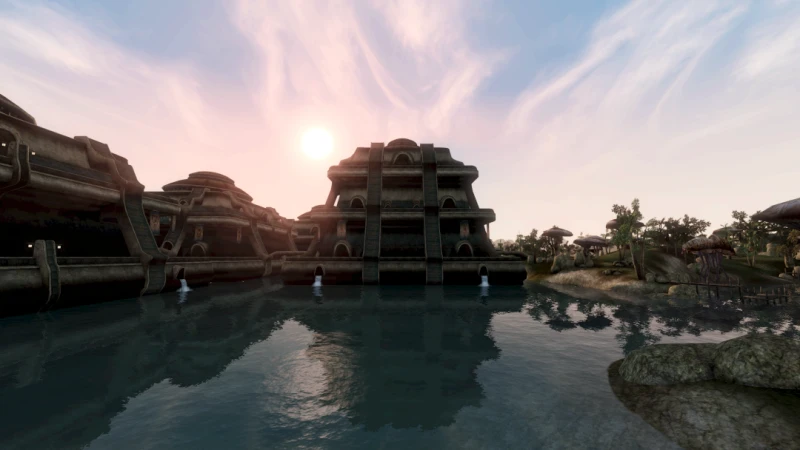
3D games from the mid 90s into the early 2000s usually had extremely basic level geometry in which most environment objects were represented by simple boxes that had most smaller details painted on as part of the flat surface textures. There were no normal maps, bump maps, or displacement maps that would produce dynamic shadows to create the appearance of three dimensional structures in the surfaces. Just some areas being painted in a darker or lighter shade that emulates shadows and highlights. I’ve seen pixel art designers and even some PS1 graphics people paint these shadows and highlights onto the image by hand. But that’s a skill that I think would take quite some time to become good at, and something that would become quite time consuming with all the textures that I want to make for Iridium Moons.
Many people who make tutorials about PS1 textures instead rely on taking photographs of real objects and massively crunching down their resolution and color depth. Which is an approach that I don’t personally like either, as in many games you can quite clearly see that it’s low-quality photos slapped onto boxes. It neither sells the illusion of looking realistic, nor does it work as a stylized look, ending up in a kind of Uncanny Valley situation that just looks bad. I’m also often quite stubborn with getting things to look exactly like I want, and finding the perfect photo references for things in my baroque space fantasy setting could also easily become a massive time sink.
So my solution to making flat 2D textures with believable shadows to create a stylized appearance of depth is to not crunch down photographs of real objects, but instead renders of 3D objects that I can quickly make myself. In this article, I will be going through the entire process that I am using and explain the reason for each step and setting. If you just want to see the specific settings that I am using, they will all be summarized at the end of the page.
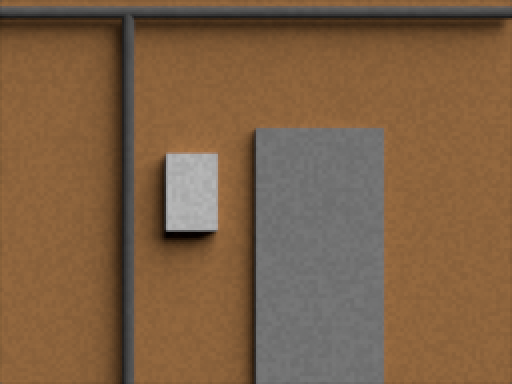
To illustrate the entire process and show how I do it, I quickly made this very simple model of a wall with a doorframe, some kind of electrical box, and two drain pipes. Three cubes and two cylinders whose textures are just one uniform color. This section of wall has a width of 4 meters and a height of 3 meters, which are numbers we are going to need later.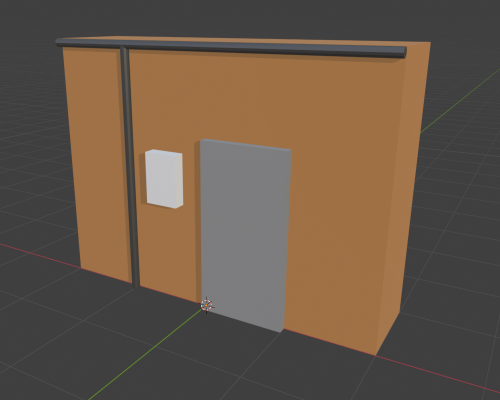
The doorway here is a single solid block without a hole for the door. I recommend not making any holes for door and windows in the model that generates the texture, since the shadows and highlights painted on the texture simulate a perception of three-dimensional depth where there is none. Having both this simulated depth from the texture and the actual depth of the level geometry on the same edge or corner looks a bit weird in my opinion.
Camera and Render Setup
Color Management
The first thing we need is to make Blender render the colors as accurately as we can get without adding any special filters or such. To do that, we have to go into the Render Properties and all the way down to Color Management. Here the View Transform needs to be set to Standard. AgX and Filmic will completely screw up the colors unless you further color grade them later, which we don’t want to have to deal with. Standard isn’t exact in its accuracy, but it gets pretty close.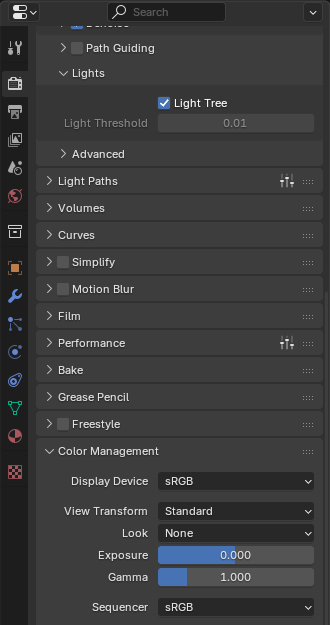
Render Output
Based on wall textures in Half-Life being 128 pixels in height, my own choice of pixel density is 64 pixels per meter, so the texture file I want to have at the end should be 256 by 192 pixels. In the Output Properties, these go into the X and Y resolution of the render. Since the texture will be just a plain image, output file format .png will do, but you can of course also make it a .bmp or .jpg if that’s what you’re using for your games.
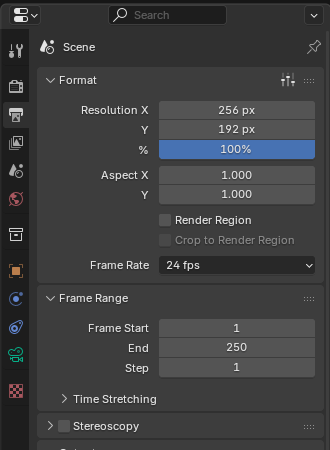
With these settings, the output file will already be scaled, cropped, and sized to the correct dimensions, which eliminates the need to do any of these things manually as you have to with a photo source.
Orthographic Camera
To get a good image of the model to use as a texture, we want to look at it straight on with minimal distortion from perspective. Conveniently, Blender provides us with exactly what we need.
I am making my models so that they are facing the direction of the Front Orthographic view that you go into by pressing 1 on the NumPad. So to have the camera that will take the final render of the model face on, I am setting its coordinates to X=0m and Y-10m, and to a Z-coordinate that is is on the center of my model. In case of this 3m high model, that’s Z=1.5m.
In the Object Data Properties of the camera, the Lens Type needs to be set from Perspective to Orthographic, which eliminates any distortions from perspective. To get the correct zoom on the camera, simply press 0 on the NumPad to see exactly what the camera is seeing right now. Set the Orthographic Scale to whatever value makes the edges of the camera view align with the area of the model you want to have in your final render. In this case, the zoom is 4.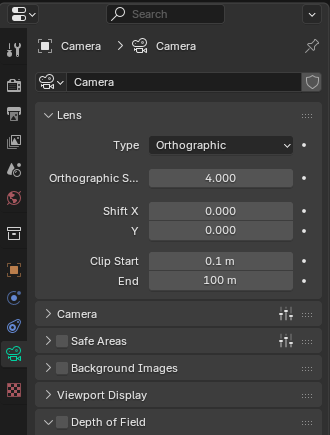
Lighting Setup
Getting believable looking shadows that sufficiently sell the illusion of depth is the whole purpose of this entire method, so here is where the actual magic happens.
Disable Other Light Sources
The first thing we want is to eliminate any interference from additional light sources in the scene. So delete any Light objects that are present in the scene, or just click on the Disable in Renders icon in the Outliner.
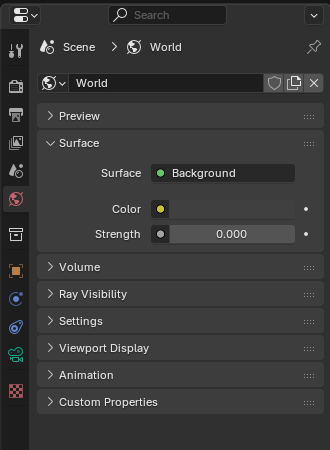
Then go into the World Properties. By default, even when there are no light sources in the scene, there is still a faint grey light that provides some visibility when Viewport Shading is set to Render. This light source is called “Surface” here in the World settings. Set the Strength to 0 to turn it off.
To get uniform lighting on our model, the only light source we are going to use is a Sun, which can be put anywhere in the scene. This means any point on the model will get light coming from the same direction and at the same intensity, which you don’t get from Point, Spot, or Area lights.
Light Orientation
Since we are producing a simple color image as our texture with no normal map or anything like that which will produce shadows based on the direction of incoming light, the shadows are going to be fixed, regardless of whatever light sources will illuminate them in a game level. Which means the shadows will almost always be incorrect in-game, and half the time even facing towards the nearest light sources instead of away from them. Shadows will also always look the same, whether the light comes from direct sunlight, an overcast sky, a flashlight, or a fire. Which in reality produce very different looking kinds of shadows. This is just something inherent to this approach to faking shadows and creating an illusion of depth that can’t be removed. But with the right lighting setup it can be made less noticeable and disrupting.
Most environmental light that we encounter anywhere in our world comes from above. But it almost never comes down to the ground at a perfect 90° right angle, and as the sun moves through the sky during the day, it starts and ends coming in perfectly horizontal. Artificial light usually comes from the center of the ceiling of a room, hitting some objects at a 0° angle and others at a 90° angle, and most somewhere in between. It’s extremely rare to have a dominant light from below. So to get shadows that look okay-ish in most light conditions, having the light come in at a 45° angle is clearly the best compromise.
But with a lot of things that are attached to or build into walls going from floor to ceiling, horizontal shadows are even more important to produce a perception of depth. It only takes a very shallow angle to create some shadows, but when objects protrude from the wall only a slight distance, like doorframes or picture frames, these shadows will be very narrow and easily disappear at the low image resolutions we are dealing with here. Having tested out various angles, what I have found is that again a 45° gets the best looking result. You could use a more shallow angle of 30° or 15°, which would draw less attention to the fact that half of all horizontal shadows are facing into the wrong direction. But if you do that, you will have to make adjustments to the light intensity, which I will get into later.
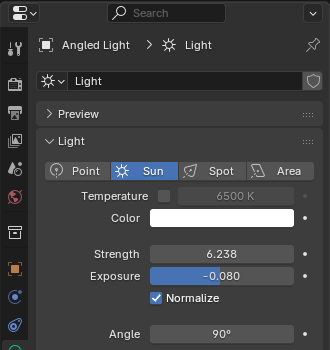
For my setup that I am using, I am setting the rotation on the light object to X=45° and Z=45°.
Light Color
Since we want the textures to appear in-game with the right colors based on the color and intensity of in-game light sources, the texture model has to be illuminated by pure white light. By default, the color of any new light in Blender is set to #FFFFFF, so nothing needs to be touched here. I wouldn’t touch color temperature, since everything we’re doing here is just raw data to be digitally processed later. And while 6500K color temperature has a point in some situations, this is not one of them.
Light Strength
The Strength of the Sun light is where things are getting a bit curious. If you’ve set the light to come in at the X=45° and Z=45° angle, the number you want to put here is 6.283. But the reason for this seemingly arbitrary value is somewhat interesting.
Blender Light Calculation Tangent
Yes, 6.283 is 2π. Apparently, the value you want for a light that comes straight down at a right angle is exactly π. I don’t know exactly how the math works, but I believe the way that Blender calculates how light spreads out through space is in a sphere emanating from a point source, which is how π comes into the equation. To have a surface rendered close to the same RGB values as its colors as specified in its texture file under perpendicular light, you have to set the Sun light strength to π (3.142).
But since our light does not hit the wall at a right angle, the same amount of light is spread out over a larger surface area of the model, and the light intensity on the surface goes down. For a simple 45° angle, the reduction in illumination and necessary increase in brightness to compensate would be √2. However, we have the light come in at both a 45° x-angle and 45° z-angle. Blender 4.5.9 calculates the dropoff by multiplying √2 by √2, which of course comes out as 2. And multiplying our initial Strength of π (3.142) by 2 gets us to the Strength setting of 6.283.
But this is actually wrong and a mistake by Blender. The correct way would be to first combine the two vectors from the two angles into a single angle and calculate the dropoff from that, which leads to the correct dropoff factor of 1.6329. It’s possible that this might get fixed in later Blender versions, in which case the light Strength needs to be set to π * 1.6329 = 5.131.
Light Exposure
However, I have found that even with the right amount of illumination from the light source, and the color management View Transform set to Standard, colors on flat surfaces in renders don’t match the RGB values specified in the object’s texture. Adjusting the Exposure in the light’s setting seems to help though. And with the color palette I am using to paint textures, I found the best result to be when setting Exposure to -0.08. Except for some shades of green, I can barely see any difference when comparing the original and rendered colors in GIMP.
Angular Diameter
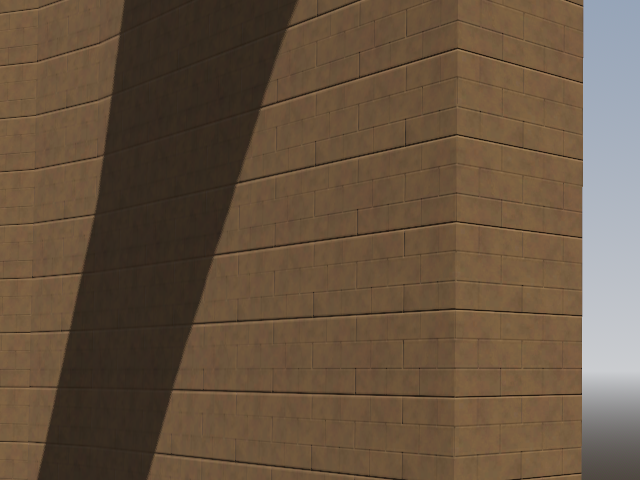
Finally we have to set the angular diameter of our Sun light, which Blender incorrectly and confusingly calls Angle in the Object Data Properties. Measuring the actual size of objects in the sky is impossible if you don’t know their distance. But you can always measure how much how much area in the sky they cover up, which is its angular diameter. (Assuming a sphere or circle with uniform diameter.) Except for hypothetical true point sources of light, all real light sources are emitting light rays from many different points all over their surface. And light rays coming from different points on the light source’s surface are able to reach different points behind an illuminated objects, effectively making every point on the light source cast their own, slightly different shadows on surfaces behind the object. If the points from which light rays emanate are very close together, their shadows will line up with each other and we get very sharp edges on the combined total shadow. If the light rays come from points that are spaces out over a very large surface, then their individual shadows will be more spread out as well, resulting in very fuzzy edges on their combined shadow.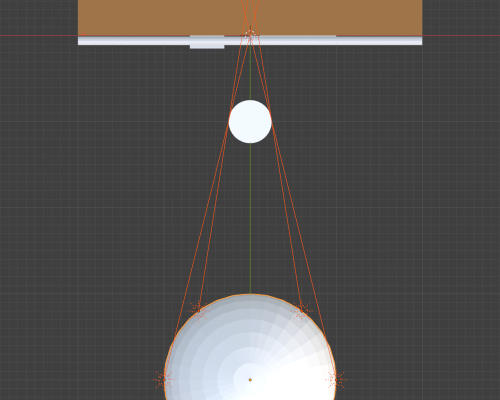
A light source with an angular diameter of 0° would produce perfectly sharp and crisp shadows. The Sun has an angular diameter of 0.5°, which is still pretty small, and as such shadows from direct sunlight are still very sharp as well. In contrast, on an overcast day, daylight comes from everywhere on the sky at seemingly the same intensity, making shadows so blurry that they have no visible edges at all. The entire sky is the inside surface of half a sphere, so its angular diameter is 180°. And that’s why 180° is the maximum angular diameter setting that Blender accepts.
Since we want the most generic shadows possible on our textures, so that they can look okay in almost all lighting conditions encountered in a game world, I think that again the middle ground between the two extremes works best, so I would set the angular diameter for the sun light to 90°.
And now all that’s left is to start rendering and it’s done.
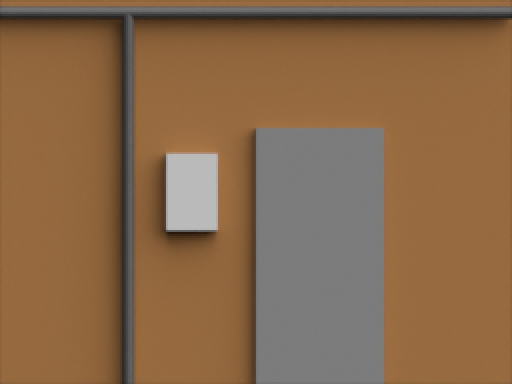
Scaled up to 200% size for better visibility in browsers.
With just the flat colors on the different surfaces, this still looks very flat and unappealing. But how to get the graininess of typical 90s textures is for a separate article.
Settings Summary
- Render Properties: Color Management: View Transform to “Standard”.
- Output Properties: Set X and Y resolution to desired output size.
- Remove or disable other light sources in the scene.
- World Properties: Surface: Strength to “0”.
- Camera Object Data Properties: Lens type to “Orthographic”.
- Add a Sun light to the scene.
- Light Object Properties: Set Rotation X and Rotation Y to “45°”.
- Light Object Data Properties: Keep color white (#FFFFFF).
- Light Object Data Properties: Set Strength to “6.283”.
- Light Object Data Properties: Set Exposure to “-0.08”.
- Light Object Data Properties: Set Angle to “90°”.
Experiment with the angular diameter and the Y-rotation on the light (and adjust the strength up and down accordingly) to see what kinds of shadows you like best.